Friday, 8 June 2012

CSI: Three Bears House. Who stole the porridge?

What a rotten week! The weather thinks it's November, I've had several jobs pulled out from beneath my feet. Next stop: cardboard box under the bridge, or maybe I'll rent a room in the Three Bears house. I hear they've got various size beds to accommodate the most gangly of illustrators!

Here's a look behind the scenes at how the three bears illustration went from this scrappy scrawl:

...to this::
(click on the pics to enlarge them)

After scanning in the original pencil rough I re-drew the lines of each element (bears, furniture, goldilocks etc ) directly into photoshop using a custom brush that acts like a 2h pencil. I deliberately gave myself a maximum of just 2 minutes per character. I worry the most about the lines so really this was a way of hurrying me along.  COME ON, HURRY UP!


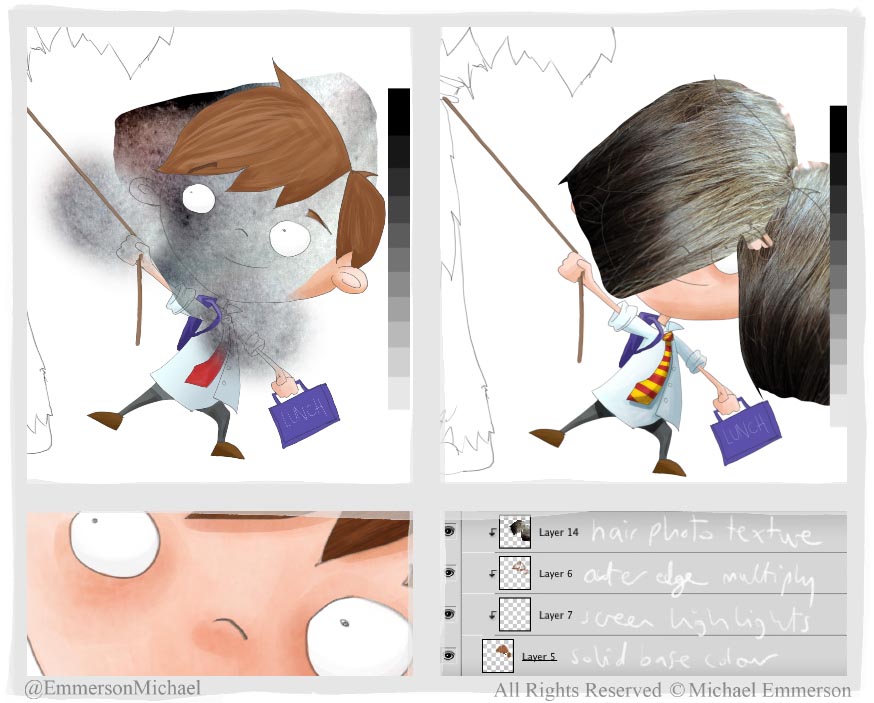
Now let's look at little Goldilocks sneaking around the staircase..
First the original pencil sketch. Quite awful isn't it?
 But, it's like shorthand to me. I know what each line is going to end up like


So, here i go on the timed photoshop pencil line (Tick Tock, 2 minutes! Time's up!)
The staircase, goldilocks and her hands are all on separate layers.


Let's add some hunky-chunky blocks of colour.


A bit of gradient and light shading on the stairs.


Some goldi-shadows on her goldi-locks, and greeni-dress. 


A touch of shade and light on her face, and oh yes, i'd forgotten her eyes! 


Finally a bit of light detail on the stairs and hair and a quick dress colour change 

Then all that's left to do is repeat for each element,add cut-out paper backing to each, fake some shadows,  create a room for them to live in and CH-Ching!

The only question left is who has been eating my porridge? Was it you? 
And, did you stir in any Golden Syrup? 


Tuesday, 5 June 2012

Jubilee Celebrations (or four unpaid days off, as i like to think of it)

I've spent quite a lot of the Jubilee weekend watching science fiction movies and eating lots of tasty food. To celebrate the cake and sci-fi here's a couple of illustrations: 

Changing of the  guards at Buckingham palace. Can you spot Morecambe & Wise amongst the guards?


and, hold on, who is this driving the bus here, and why is Doctor Who not travelling by Tardis?


Friday, 1 June 2012

What's In the Box?

Look what turned up in the post today - no, it's not a secret stash of delicious donuts, but an educationally nourishing set of learning flashcards I did for Oxford University Press last year. 

the box is FULL of my drawings!


and more and more and more...


 There are hundreds and hundreds! I had actually forgotten how many i had done!
The flashcards help children learn concepts such as weather, time, colours, meals as well as everyday objects, vehicles and animals.

  I drew everything from Agriculture to Zoology, Apple to Zebra, Chimpan-A to Chimpan-Zee.


It's always nice to receive actual copies of things you've worked on, and nice to know that kids around the world will be learning from pictures you've drawn.  


Friday, 18 May 2012

After all the hard work there must be Playtime!


What a busy day! First there was all that business with the evil time travelling dinosaur, then I had to do an emergency fairy drawing for a publisher, solve some spoooooky mysteries, and now i've just started work on 40 characters for an activity book (to be completed in two days - zoinks!)
However, I've been itching to get a few new pics done for my portfolio. I sketched out 5 or so roughs last night which i'll work up the middle of next week, but i felt i had to get at least one finished before the weekend. 

Hold on...Forty characters drawn and coloured up in 2 days? 
I can't stand here all day talking to you, i've got work to do. To the Bat Cave! 


Wednesday, 16 May 2012

You've been a very naughty Dragon!

Crikey, i feel rotten today! But enough about me, how are you? Your hair looks nice, did you get a haircut?
I promised myself to update the blog today, so i'm fighting through the pain.  Just a quick one showing the sketchy stages of a particularly angry knight telling off a dragon for setting fire to his garden. When i've got rid of this pesky headache i'll go into more detail and just maybe i'll show you how I taught myself how to model this scene in 3D - futuristic space adventure 3D!

PS i think i really nailed the scorched trees here!

Friday, 11 May 2012

Strong Mouse Lifts Strong Lion (Featuring Card Tricks)


A very happy Friday to you. I've got no work to do today, so I'm off out to put up a picture frame for my Mum,  but i wish i was going to a Circus where there was a weight lifting lion doing card tricks while being lifted by a strong mouse.
Before you go, here's some of the in progress roughs, so you can see how very rough my sketches can be.  Please remember to buy a circus souvenir from the kiosk. 

Thursday, 10 May 2012

"How did you do that?"

Whenever I show someone something from my portfolio i usually get asked:
"how did you get in my house?",  but more often "how did you do that?".
Take this illustration for a story about a boy that takes his friendly blue monster to school for Show and Tell day...


Like most pictures I draw, I pretty much have the image fully painted and finished in my head in a matter of seconds, it's the getting it onto the page that takes time.

I normally start with a very quick pencil sketch on very real paper , no more than a couple of minutes for roughing out the compostion and poses. I'll scan this in to my mac using some kind of wireless witchcraft and begin to draw each character and element in their own layer in Photoshop.  I work at higher than standard resolutions (400-600dpi), it just gives me better results if i have to scale stuff up/down later.


Then I usually work on each character and background as a separate file, I might block out large scale colours as a guide, frequently checking they all the bits are playing nicely together. For this boy i made a blocked out a base colour layer .
I then try to workout what his different 'colour sections' are (in this case hair, skin, shirt, trousers, lunchbox).  On separate layers for each 'section' i build up simple gradients and shade, using custom photoshop brushes which behave a bit like acrylic paint (it's what i would use in the real world, but the computer screen gets very messy).
I start with big quick broad strokes, and work down to ever smaller and softer brushes for more detail and better colour blending.


When i feel i've done enough with brush work, i have a cup of tea and hope someone will have finished the picture for me when i return. This rarely happens.

So instead it's time to add another level of detail with a few select photo textures. I've got quite a big library of my own photos that i can delve into for all kinds of uses. Below, you can see how the raw texture looks, before i clip-mask it over the main block of colour. I've used a very high contrast montage of my skin (it doesn't look like that in real life) and my wife's hair (it does look like that in real life). I continue adding more layers of tone and brush marks until it feel just right.

And so, i continue in that fashion of adding layers of brushwork, textures and shading to blocks of colour until TING! the character is baked. On last thing I do is check the contrast levels are all ok. It, so i use the that black & white strip on the side to give me a contrast reference. I naturally tend to colour things a bit pale or washed out, so there's no harm on keeping that in check, is there?


That's one boy done, only all the rest to go. I work faster than a speeding bullet, so i usually can get a double page spread like this done in a day, from sketch to final. 

So in conclusion to the original questions, a) I did it like I just said, only more complicated, 
and b) I fell down the chimney.